A Complete Guide to Using Mitutoyo Dial Indicators
Publish Date: 21 Jan 2026
You know that feeling when you are trying to figure out if a metal surface is perfectly flat or if a rotating shaft has the tiniest wobble, but your eyes just aren't sharp enough to see the difference? That is exactly why the dial indicator was invented. It takes those invisible physical deviations and turns them into a needle movement you can actually see and measure with incredible precision.
Whether you are checking for "run-out" on a lathe or aligning a machine, the mitutoyo dial gauge is the industry standard for getting the job done right.

What Is a Dial Gauge Indicator and Why It Is Used?
A dial gauge (dial indicator gauge) is a precision instrument used to measure small linear displacement relative to a reference surface. Unlike calipers or micrometers, a dial gauge does not measure absolute size—it measures variation.
A dial gauge Mitutoyo is commonly used for:
- Checking runout and concentricity
- Measuring flatness and parallelism
- Aligning machine components
- Monitoring deflection during load or motion
Because these measurements directly affect fit, function, and repeatability, dial indicators are widely used in quality control, machine setup, inspection, and maintenance.

Understanding the Parts of a Dial Gauge Mitutoyo
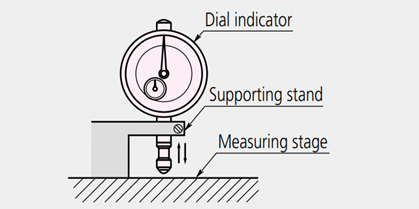
Before you start measuring, you need to know what you are looking at. A dial indicator mitutoyo consists of several precision-engineered parts that work together to translate linear movement into a circular reading.
- The Dial Face: This is where you see the results. It includes the hand (pointer) and often a smaller revolution counter.
- The Bezel and Bezel Clamp: The outer ring can be rotated to "zero" the gauge, and the clamp locks it in place.
- Limit Markers: These small physical tabs can be set to show your acceptable tolerance range at a glance.
- The Stem and Spindle: The stem is the mounting point, while the spindle (or plunger) is the part that actually moves up and down.
- Contact Point: The very tip that touches your workpiece. These are often replaceable depending on the surface you are measuring.

How to Read Dial Gauge Indicators Correctly
Not every dial gauge indicator reads the same way. Depending on your specific task, you might be using one of three common dial faces:

- Continuous Dial: Used for direct reading. The numbers continue around the entire face.
- Balanced Dial: Used for reading the difference from a reference surface. The “0” is at the top, and it shows plus or minus deviations.
- Reverse Reading Dial: Typically used for depth or bore gauge measurements.
When performing a dial gauge reading, always look at the small revolution counter first to see how many full turns the main needle has made, then add the fractional reading from the large dial. If you are using a digital dial gauge, this process is simplified with a clear numerical display, though the mechanical principles remain the same.
Mounting Your Dial Gauge with a Magnetic Base
A dial indicator is only as accurate as its mounting. If the gauge moves even a hair during the process, your data is useless. This is why using a dial gauge magnetic stand is essential.
There are two primary ways to mount your dial gauge:
| Stem Mounting: Clamping the stem directly with a screw or a split-body fastening. The mounting hole tolerance is typically ø8G7 (+0.005 to 0.02). | Lug Mounting: Using the "lug" on the back of the gauge for specialized holders. |
 |
 |
When using a dial gauge with magnetic base, ensure the spindle is in line with the intended measurement direction to avoid "cosine-effect" errors.
How to Use Dial Gauge Tools for Maximum Accuracy
To get the most out of your mitutoyo dial gauge, follow these professional tips:
- Avoid the Cosine Effect: If the measuring direction is misaligned with the intended direction of measurement, the reading will be inaccurate. Compensate for the angle if straight-on measurement is not possible.
- Cleanliness Matters: Before using the gauge, wipe the contact point and the workpiece. Even a tiny piece of dust can affect a 0.001 mm reading.
- Spindle Care: Never lubricate the spindle with oil, as this can attract dust and cause malfunction. If movement feels sticky, clean the spindle with a dry or alcohol-soaked cloth.
- Repeatability Check: Push the contact point quickly and slowly five times against a steady surface to ensure the needle returns to the exact same position each time.

Get Genuine Mitutoyo Precision at MISUMI
When accuracy is the foundation of your work, you cannot afford to use subpar tools. Mitutoyo is committed to delivering the latest technology in dimensional metrology, supported by world-class service. Whether you require a classic mechanical indicator or an advanced digital dial gauge, choosing a supplier you can trust is essential.
MISUMI offers an extensive range of genuine Mitutoyo dial gauge products and accessories, including dial gauge magnetic stands and replaceable contact points.
Ready to upgrade your measurement accuracy? Shop Mitutoyo Indicators and Accessories at MISUMI today.

Frequently Asked Questions (FAQs)
1. What is a dial indicator used for?
A dial indicator, also called a dial gauge, is used to measure small linear displacement such as runout, flatness, parallelism, and alignment on machine parts. It is a key tool in quality control, machine setup, and inspection, helping engineers confirm whether a surface or rotating shaft stays within tolerance.
2. What is the difference between a dial gauge and a dial indicator?
There is no real difference — a dial gauge and a dial indicator are the same precision measuring instrument. Both terms describe a tool that converts small linear movement into a needle reading on a dial face. In India, "dial gauge" is the more common shop-floor term, while "dial indicator" is the standard technical name used globally.
3. How do you read a dial indicator correctly?
To read a dial indicator, first check the small revolution counter to see how many full turns the needle has made, then read the main dial for the fractional value. A continuous dial reads directly, a balanced dial shows plus or minus deviation from zero, and a reverse reading dial is used for depth or bore measurements. Always zero the bezel before taking a reading.
4. How do you mount a dial indicator with a magnetic base?
Mount the dial indicator's stem or lug onto the magnetic base, then position the base on a flat reference surface close to the workpiece. Keep the spindle aligned with the direction of measurement to avoid cosine-effect errors, and make sure the magnetic base is locked securely before you take a reading.
5. How accurate is a Mitutoyo dial indicator?
Mitutoyo dial indicators are built for high precision, with many models resolving measurements down to 0.001 mm. Real-world accuracy depends as much on clean contact points, correct mounting, and proper alignment to avoid cosine-effect errors as it does on the gauge itself.


