(!)NOTE : Windows 7 users won’t be able to use some latest features of eCatalog/WOS since Microsoft is ending support for Windows 7 on 14 Jan, 2020. Please upgrade your system for uninterrupted services.
- Notice of End of Sales for Economy Series Pneumatic Equipment Category. More information.
Outer Diameter
Material
Number of Stopper Points
Inner Dia. P
Length L
type
Surface Treatment
CAD
Days to Ship
Specification/Dimensions
-
Outer Diameter(mm)
-
Material
- Steel
- Stainless Steel
- Steel
-
Number of Stopper Points
- Fixed at 3 places
- Fixed at 4 places
-
Inner Dia. P(mm)
-
Length L(mm)
-
type
- E-JBTF
- E-JBTFM
- E-JBYF
- E-JBYFB
- E-JBYFC
- E-JBYFM
- E-JBYFS
-
Surface Treatment
- Not Provided
- Electroless Nickel Plating
- Black Oxide
-
CAD
- 2D
- 3D
Days to Ship
-
- All
- 9 Day(s) or Less
Specify Alterations
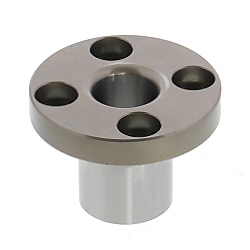
Bushings for Locating Pins Round Flanged
You can add up to 6 items per a category to the compare list.
Brand :
MiSUMi Economy
Part Number :

Copy Part Number URL to Clipboard
The part number URL has been copied into your clipboard.-
- Order Qty :
-
-
- Price :
- ---
-
- Total Price :
- ---
-
- Days to ship :
- ---
Select part number to Order Now/ Add to Cart
Product Overview
The bushing for locating pin is a mechanical positioning part that is used in conjunction with a positioning pin to achieve a guiding effect, in whch the round flanged type can be fixed by bolt, is easy to install, has high fixing strength (falloff prevention), and can effectively prevent the rapid wear of the workpiece.
Dimensional Drawing

Specifications Overview
■Material Specification Table
 If there are requirements for rust prevention, give priority to the products with surface treatment of electroless nickel plating or products made of austenitic stainless steel.
 Since the wall thickness of the countersunk hole is only about 1.5mm and the product is hard, make sure that the flange edge fits perfectly with the mounting surface before locking the bolt. Otherwise there is a risk of rupture of the countersunk hole.
 The I.D. tolerance of bushing is high. If a vernier caliper is used for detection, the measurement result will be too small. It is recommended to use a high-precision measuring tool (internal micrometer or plug gauge, etc.) for detection.
| Type |  Material Material |  Surface Treatment Surface Treatment |  Hardness Hardness | |
| Custom P Dimension, L Dimension | Custom P Dimension | |||
| Fixed at 4 points | Fixed at 3 points | |||
| E-JBYF | E-JBTF | Equivalent to 9CrWMn (Alloy Tool Steel or Bearing Steel) | - | Quenching hardness 56~60HRC |
| E-JBYFB | - | Ferroferric Oxide Protective Film | ||
| E-JBYFM | E-JBTFM | Electroless Nickel Plating | ||
| E-JBYFS | - | Austenitic stainless steel | - | - |
| E-JBYFC | - | Martensitic stainless steel | - | Quenching hardness 50HRC~ |
 If there are requirements for rust prevention, give priority to the products with surface treatment of electroless nickel plating or products made of austenitic stainless steel.
 Since the wall thickness of the countersunk hole is only about 1.5mm and the product is hard, make sure that the flange edge fits perfectly with the mounting surface before locking the bolt. Otherwise there is a risk of rupture of the countersunk hole.
 The I.D. tolerance of bushing is high. If a vernier caliper is used for detection, the measurement result will be too small. It is recommended to use a high-precision measuring tool (internal micrometer or plug gauge, etc.) for detection.
Specification Table
■Custom P Dimension, L Dimension
 L+T≤P×3.0
| Part Number |  P P0.01mm increments |  L L0.1mm increments | H | T | A | d | d1 | h | ||
 Type Type |  Dg7 Dg7 | |||||||||
| Round·4-Point Stopper E-JBYF E-JBYFB E-JBYFM E-JBYFS JBYFC Round·3-Point Stopper E-JBTF E-JBTFM | 10 | -0.005 -0.020 | 4.00~ 6.50 | 5.0~15.0 | 25 | 5 | 17 | 3.3 | 6.5 | 3.5 |
| 12 | -0.006 -0.024 | 6.00~ 8.50 | 28 | 20 | ||||||
| 15 | 8.00~10.50 | 10.0~35.0 | 36 | 6 | 26 | 4.5 | 8 | 4.5 | ||
| 18 | 10.00~12.50 | |||||||||
| 20 | -0.007 -0.028 | 12.00~13.50 | 40 | 30 | ||||||
| 22 | 12.00~13.50 | |||||||||
| 25 | 13.00~15.50 | 44 | 34 | |||||||
| 26 | 15.00~16.50 | |||||||||
| 30 | 16.00~20.50 | 12.0~50.0 | 56 | 8 | 42 | 6.6 | 11 | 6.5 | ||
| 35 | -0.009 -0.034 | 20.00~25.00 | 60 | 46 | ||||||
 L+T≤P×3.0
Product Features

Feature 1: round flanged type is pressed in, and then fixed using bolts for high fixing strength.
Feature 2: electroless nickel plated and stainless steel types can effectively prevent rust.
Feature 3: Optional material: iron (alloy tool steel or bearing steel); austenitic stainless steel (martensitic stainless steel); austenitic stainless steel, suitable for positioning of various workpieces.
Feature 2: electroless nickel plated and stainless steel types can effectively prevent rust.
Feature 3: Optional material: iron (alloy tool steel or bearing steel); austenitic stainless steel (martensitic stainless steel); austenitic stainless steel, suitable for positioning of various workpieces.
Precautions
①Dimensional tolerance and fit parameter table For details, click  Dimensional Tolerance Fit Table
②Change in inner diameter of the fixture bushing during press-fit
■Change in inner diameter of the fixture bushing during press-fit
The fixture bushing shrinks when press-fitted.
The shrinkage rate varies depending on material of mounting part and D dimension tolerance of bushing.
【Example of Shrinkage during Press-Fit】
Before press-fit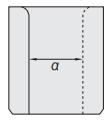
After press-fit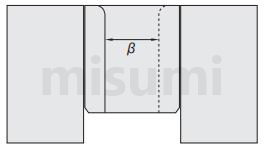 ③Reference table for common dimensions without indicated tolerance (medium accuracy m) For details, click
  Table of Dimensions Without Indicated Tolerance
 Dimensional Tolerance Fit Table
②Change in inner diameter of the fixture bushing during press-fit
■Change in inner diameter of the fixture bushing during press-fit
The fixture bushing shrinks when press-fitted.
The shrinkage rate varies depending on material of mounting part and D dimension tolerance of bushing.
【Example of Shrinkage during Press-Fit】
Before press-fit

After press-fit

βDimension (when mounting hole is H7)
| D Dimension Tolerance | ||
| Mounting Material | m7 | p7 |
| Steel | αX99.93% | αX99.90% |
| Aluminum Alloy | αX99.96% | αX99.93% |
 Table of Dimensions Without Indicated Tolerance
Example of Use

Example introduction: Application of flanged bushings for locating pins in fixtures
Function description and precautions:
The fixture plate has positioning accuracy requirements during operation, and is designed to use a bushing to mate with the locating pin to ensure positioning accuracy. Since the fixture plate is susceptible to impact during operation, the bushing is bolted and countersunk in areas where space is confined.
Advantages of flanged fixture bushings:
①The bushing hardness is slightly lower than the positioning pin, which effectively protects the positioning pin from rapid wear and ensures the positioning accuracy.
②The bushing is easy to replace when it wears out, effectively protecting the bottom plate or workpiece from damage.
③Bolts can be used for fixing to ensure that the bushing will not fall off or rotate under the actual operating condition.
Application Industries
| Lithium battery | Smart Phones | Electronic & Electrical | ||
 |  |  | ||
| Semiconductor | Medical | Food | ||
 |  |  |
Related Products
| Locating Pins Large Head, Tapered, Press Fit, Standard | Locating Pins Straight, Cone Head | Fixture Bushings Shouldered, Standard | ||
 |  |  | ||
| Representative model: JPBB6-10 | Representative model: CUM6-15 | Representative model: JBH5-8 | ||
| Advantages: standard shape, widely used | Advantages: affordable price | Advantages: Standard Specification |
Related Documents
①Positioning technology reference information Click  Positioning Technology
②Surface treatment related anti-rust ability salt spray test reference Click Anti-rust Reference for Metal
 Positioning Technology
②Surface treatment related anti-rust ability salt spray test reference Click
 Anti-rust Reference for Metal
Part Number
- Incomplete part number.
Please use left hand selections to complete a part number.
Loading...
| Part Number |
|---|
| E-JBTFM10-P[4-6.5/0.01]-L[5-15/0.1] |
| E-JBTFM12-P[6-8.5/0.01]-L[5-15/0.1] |
| E-JBTFM15-P[8-10.5/0.01]-L[10-35/0.1] |
| E-JBTFM18-P[10-12.5/0.01]-L[10-35/0.1] |
| E-JBTFM20-P[12-13.5/0.01]-L[10-35/0.1] |
| E-JBTFM22-P[12-13.5/0.01]-L[10-35/0.1] |
| E-JBTFM25-P[13-15.5/0.01]-L[10-35/0.1] |
| E-JBTFM26-P[15-16.5/0.01]-L[10-35/0.1] |
| E-JBTFM30-P[16-20.5/0.01]-L[12-50/0.1] |
| E-JBTFM35-P[20-25/0.01]-L[12-50/0.1] |
| E-JBYFM10-P[4-6.5/0.01]-L[5-15/0.1] |
| E-JBYFM12-P[6-8.5/0.01]-L[5-15/0.1] |
| E-JBYFM15-P[8-10.5/0.01]-L[10-35/0.1] |
| E-JBYFM18-P[10-12.5/0.01]-L[10-35/0.1] |
| E-JBYFM20-P[12-13.5/0.01]-L[10-35/0.1] |
| E-JBYFM22-P[12-13.5/0.01]-L[10-35/0.1] |
| E-JBYFM25-P[13-15.5/0.01]-L[10-35/0.1] |
| E-JBYFM26-P[15-16.5/0.01]-L[10-35/0.1] |
| E-JBYFM30-P[16-20.5/0.01]-L[12-50/0.1] |
| E-JBYFM35-P[20-25/0.01]-L[12-50/0.1] |
| Part Number | Price | Minimum Order Qty. | Volume Discount | Days to Ship | RoHS | Outer Diameter (mm) | Material | Surface Treatment | Number of Stopper Points | Inner Dia. P (mm) | Length L (mm) |
|---|---|---|---|---|---|---|---|---|---|---|---|
- | 1 Piece(s) | 9 Day(s) | 10 | 10 | [Steel] Equivalent to 9CrWMn (alloy tool steel or bearing steel) | Electroless Nickel Plating | Fixed at 3 places | 4 ~ 6.5 | 5 ~ 15 | ||
- | 1 Piece(s) | 9 Day(s) | 10 | 12 | [Steel] Equivalent to 9CrWMn (alloy tool steel or bearing steel) | Electroless Nickel Plating | Fixed at 3 places | 6 ~ 8.5 | 5 ~ 15 | ||
- | 1 Piece(s) | 9 Day(s) | 10 | 15 | [Steel] Equivalent to 9CrWMn (alloy tool steel or bearing steel) | Electroless Nickel Plating | Fixed at 3 places | 8 ~ 10.5 | 10 ~ 35 | ||
- | 1 Piece(s) | 9 Day(s) | 10 | 18 | [Steel] Equivalent to 9CrWMn (alloy tool steel or bearing steel) | Electroless Nickel Plating | Fixed at 3 places | 10 ~ 12.5 | 10 ~ 35 | ||
- | 1 Piece(s) | 9 Day(s) | 10 | 20 | [Steel] Equivalent to 9CrWMn (alloy tool steel or bearing steel) | Electroless Nickel Plating | Fixed at 3 places | 12 ~ 13.5 | 10 ~ 35 | ||
- | 1 Piece(s) | 9 Day(s) | 10 | 22 | [Steel] Equivalent to 9CrWMn (alloy tool steel or bearing steel) | Electroless Nickel Plating | Fixed at 3 places | 12 ~ 13.5 | 10 ~ 35 | ||
- | 1 Piece(s) | 9 Day(s) | 10 | 25 | [Steel] Equivalent to 9CrWMn (alloy tool steel or bearing steel) | Electroless Nickel Plating | Fixed at 3 places | 13 ~ 15.5 | 10 ~ 35 | ||
- | 1 Piece(s) | 9 Day(s) | 10 | 26 | [Steel] Equivalent to 9CrWMn (alloy tool steel or bearing steel) | Electroless Nickel Plating | Fixed at 3 places | 15 ~ 16.5 | 10 ~ 35 | ||
- | 1 Piece(s) | 9 Day(s) | 10 | 30 | [Steel] Equivalent to 9CrWMn (alloy tool steel or bearing steel) | Electroless Nickel Plating | Fixed at 3 places | 16 ~ 20.5 | 12 ~ 50 | ||
- | 1 Piece(s) | 9 Day(s) | 10 | 35 | [Steel] Equivalent to 9CrWMn (alloy tool steel or bearing steel) | Electroless Nickel Plating | Fixed at 3 places | 20 ~ 25 | 12 ~ 50 | ||
- | 1 Piece(s) | 9 Day(s) | 10 | 10 | [Steel] Equivalent to 9CrWMn (alloy tool steel or bearing steel) | Electroless Nickel Plating | Fixed at 4 places | 4 ~ 6.5 | 5 ~ 15 | ||
- | 1 Piece(s) | 9 Day(s) | 10 | 12 | [Steel] Equivalent to 9CrWMn (alloy tool steel or bearing steel) | Electroless Nickel Plating | Fixed at 4 places | 6 ~ 8.5 | 5 ~ 15 | ||
- | 1 Piece(s) | 9 Day(s) | 10 | 15 | [Steel] Equivalent to 9CrWMn (alloy tool steel or bearing steel) | Electroless Nickel Plating | Fixed at 4 places | 8 ~ 10.5 | 10 ~ 35 | ||
- | 1 Piece(s) | 9 Day(s) | 10 | 18 | [Steel] Equivalent to 9CrWMn (alloy tool steel or bearing steel) | Electroless Nickel Plating | Fixed at 4 places | 10 ~ 12.5 | 10 ~ 35 | ||
- | 1 Piece(s) | 9 Day(s) | 10 | 20 | [Steel] Equivalent to 9CrWMn (alloy tool steel or bearing steel) | Electroless Nickel Plating | Fixed at 4 places | 12 ~ 13.5 | 10 ~ 35 | ||
- | 1 Piece(s) | 9 Day(s) | 10 | 22 | [Steel] Equivalent to 9CrWMn (alloy tool steel or bearing steel) | Electroless Nickel Plating | Fixed at 4 places | 12 ~ 13.5 | 10 ~ 35 | ||
- | 1 Piece(s) | 9 Day(s) | 10 | 25 | [Steel] Equivalent to 9CrWMn (alloy tool steel or bearing steel) | Electroless Nickel Plating | Fixed at 4 places | 13 ~ 15.5 | 10 ~ 35 | ||
- | 1 Piece(s) | 9 Day(s) | 10 | 26 | [Steel] Equivalent to 9CrWMn (alloy tool steel or bearing steel) | Electroless Nickel Plating | Fixed at 4 places | 15 ~ 16.5 | 10 ~ 35 | ||
- | 1 Piece(s) | 9 Day(s) | 10 | 30 | [Steel] Equivalent to 9CrWMn (alloy tool steel or bearing steel) | Electroless Nickel Plating | Fixed at 4 places | 16 ~ 20.5 | 12 ~ 50 | ||
- | 1 Piece(s) | 9 Day(s) | 10 | 35 | [Steel] Equivalent to 9CrWMn (alloy tool steel or bearing steel) | Electroless Nickel Plating | Fixed at 4 places | 20 ~ 25 | 12 ~ 50 |
Loading...
Basic Information
| Basic Shape | Flanged | I.D. Shape | Circular | Fixing Support | Not Provided |
|---|---|---|---|---|---|
| Type | Bushing | P Fixed, L Selectable / P, L Configurable | P, L configurable | D Tolerance | g7 |
- The specifications and dimensions of some parts may not be fully covered. For exact details, refer to manufacturer catalogs .


How can we improve?
How can we improve?
Thank you for your time.
Your feedback is essential for our continuous improvement
Privacy Policy
Thank you for your cooperation.
Thank you for your time.
Your feedback is essential for our continuous improvement
Please use the inquiry form.
Privacy Policy